On the knit side
m1L : make 1 left, (left slanted increase)
 .
.
.
With the left needle pick up the strand between 2 stitches, from front to back and knit through the back loop.
.
.
.
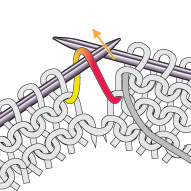
m1R : make 1 right, (right slanted increase)
 .
.
.
With the left needle pick up the strand between 2 stitches, from back to front and knit through the front loop.
.
.
.
.
.
And here is the trick to remember and never forget: (watch the front leg that is closest to the knit side: the red leg in the pics)


See how the front leg is pointing to the And here the front leg is pointing to
left ? This must be m1L (make 1 left), right ? the right. This must be m1R (make 1
… right)
~~~~~~~~~~~~~~~~~~~~~~~~~~~~~~~~~~~~~~~~~~~~~~~~~~~~~~~~~~~~~~~~~~
On the purl side
This is a little different and a bit more complicated to explain, but once captured, it is very easy to remember. The m1pL (make 1 purl stitch to the left) and m1pR (make 1 purl stitch to the right) are described as seen on the knit side (often the right side of your work). In fact on the purl side it is harder to see a significant difference in direction of both increases. So, m1pL is left leaning on the knit side. Consequently, the m1pR is right leaning on the knit side.
m1pR : make 1 purl stitch right, (right slanted increase as seen from the knit side)
 .
.
.
With the left needle pick up the strand between 2 stitches, from back to front and purl through the front loop.
.
.
.
.
.
m1pL : make 1 purl stitch left, (left slanted increase as seen from the knit side)

.
.
.
With the left needle pick up the strand between 2 stitches, from front to back and purl through the back loop.
.
.
.
.
.
.
And now the trick.
As said before right and left in the purl increases refer to the knit side.

See how the front leg is pointing to The front leg is pointing to the left.
the right ? This is m1pR that This should be m1pL that matches
matches a m1R at the knit side. a m1L at the knit side.
Memo – if ‘left’ and ‘right’ don’t love you 😉
Now, if you don’t want to hurt your brain with ‘right’ and ‘left’, just think of increases leaning away from or leaning towards a marker and watch the legs closest to the right side which is often the knit side.
On the knit side: leaning away from a marker in the middle
 marker
and on the purl side: watch the back leg closest to the knit side leaning away from a marker in the middle
 marker
Well that’s it. I never ever think about left or right anymore. I think of increases leaning away from a marker or towards a marker …

Pingback: how to … work an ESTONIAN BRAID aka VIKKEL BRAID … | ALFAKNITS
you make it easy-peasy to remember…thanks!
Well, I had to find a way to make me remember it myself. ‘Right’ and ‘left’ are not my strongest points 😉
I use a mnemonic to remember the difference: the words “right” and “rear” begin with the same letter. So if I want a right-leaning make 1, I put the left needle in the rear of the stitch. Therefore, for a left-leaning M1, I go into the front of the stitch. Frankly, I’ve never done this increase on the purl side, but if I needed to, I’d just tell myself to go the opposite way as I would on the knit side.
Sorry, forgot to also say thanks for the clear diagrams and explanations!
Ooh, that’s a good method to remember too. Everyone has a trick. Thanks for sharing 🙂
Oh my goodness, I love you. 🙂 Thank you so much for enabling this continental knitter to see how to m1 purlwise and why. So clear.
Brilliant! A great reminder – if you want to know the result, look at what you’re doing and *see* the result.
Reblogged this on Jo-Creates and commented:
I’m making a new cardigan and it has tonnes of M1L, M1R, M1pR M1pL in it, I’m constantly forgetting which is which but this is a really handy tutorial to remember which is which! 🙂
Great Tutorial, I hope you don’t mind but I’ve re-blogged it 🙂
Thanks. Absolutely not. I think it can help out a lot of people … left and right, never a simple issue 😉
Or just remember the mnemonic: I LEFT the FRONT door open – I’ll be RIGHT BACK.
Pingback: M1L, M1R : good explanation – Centre Knitters Guild
Mind blown. Thank for saving me from googling EVERY SINGLE TIME which increase leans which way.
Happy to help 🙂
Thank you!!!!
First when I found this tutorial I was happy, but now I’m a bit confused. I have two different sweater patterns that have these (quite the opposite) directions for m1pR and m1pL: “m1Rp = lift strand between needles from back to front and purl into the front loop” and “m1Lp = lift strand between needles from front to back and purl into the back loop”. And they are definitely meant to match m1R and m1L, so they are following the same logic that the R and L in m1p refer to knit side.
Looking at your tutorial pictures, if the stitch leg to closest to the knit side is pointing to the right when looking at it from the purl side, isn’t it then pointing to the left when looking from the knit side (“right side”), making it a left leaning increase?
I’m not very good at all with these kinds of visual left/right things, so now I’m trying to figure out what the thing is that I’m not seeing 🙂 Can you help me understand, please? 🙂
Yes, right. You are right, I think. I was so occupied to make it visual and clear – and to be honest I don’t think about right and left anymore since I look at increases this way – that I overlooked the fact that when turning the work to the right side it points the opposite way. I changed the tutorial and actually it makes it easier to explain the m1pR and m1pL. Also added a little memo for people who don’t like ‘left’ and ‘right’.
Thank you! That helps so much.
Thank you. This is so useful, honestly the clearest explanation for a newbie I have found.
Is it okay to share this link with others in a FB group?
Yes, no problem to share the link
Wonderful presentation. I wonder how this works in the round? My pattern reads “M1p” as I am knitting continental style on dpns with Romi HIll’s Elven Cloche pattern. Do I just pick either right or left and be consistent with that direction? Your response will be greatly appreciated.
Hi Carmen, If m1p is on the right side of the ‘Cloche’, it is not very important which one you work (left or right; I would pick the easiest one), just be consistent with the one you chose. Happy knitting.
Thank you for these great directions and diagrams! I’m just learning how to knit and was constantly getting confused. Now I leave your page open for easy reference.
Thank you so much! This helped me alter the patterns as I would some rows to switch to a purl
Good, clear instructions!
Thanks