. . . vive la FF… fête . . .

I started a new project some time ago. I have lots of fingering weight skeins in tints of blues; a few full skeins but also a lot of half skeins and small leftovers…

And I liked the spiraling colorwork of the festive mitts I just made.

Plus, I have a pattern that is just perfect to play with colors and charts: my FF backward

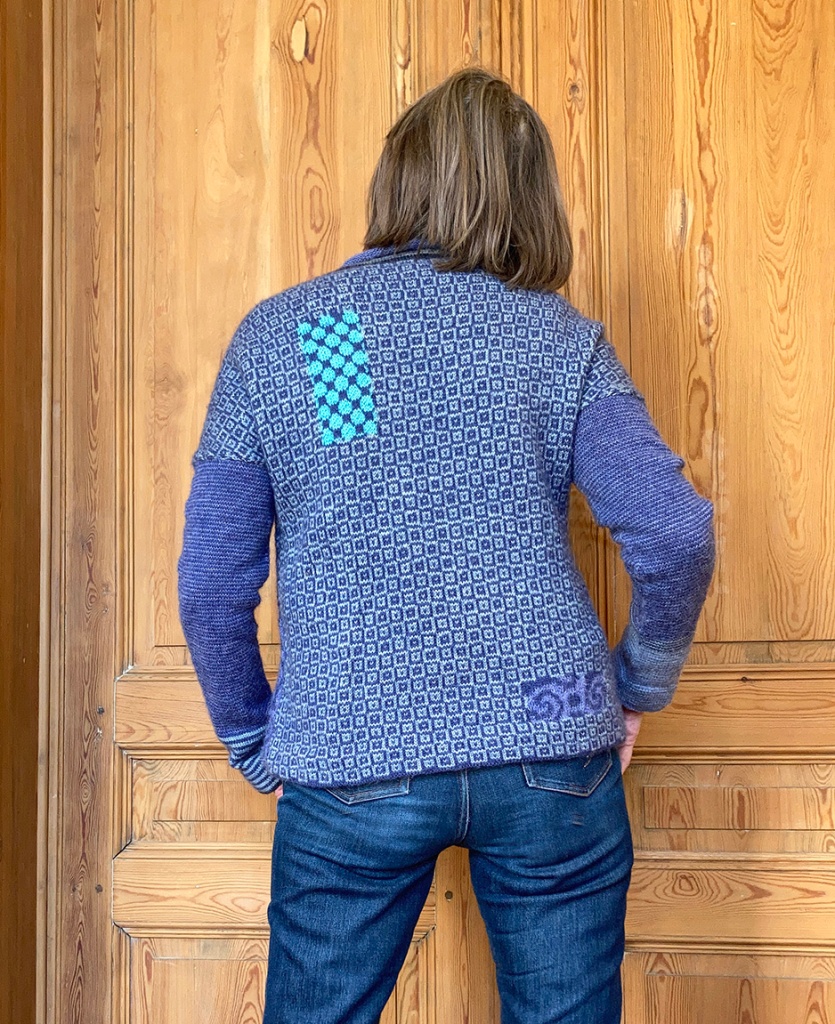
I wanted it a little bit less wide so I followed the numbers for S (I usually take M). I started the front with a provisional cast on (167 sts) because I was not sure yet how to do the hem. After 5 repeats + 1 row (= 116 rows) the armhole shaping starts which takes another 72 rows.

My gauge = 29 sts and 33.5 rows. That looks OK.

Front and back are knitted separately back and forth, then sewn together at the sides and the top. I am quickly bored so the back will have another chart, a little more squared, not round or spiralled. Worked it the same way as the front to the armhole (provisional cast on, 116 rows, …) with a difference: some intarsia labels in other blues to create some variety.

Intarsia is so much easier worked back and forth instead of in the round.

The front is ready and the back is finished with a striped band in very dark blue and white. They are ready to be assembled… The sides and top are sewn. Then I wanted a simple hem, no ribbing or anything fancy. I unraveled the provisional cast on’s and knitted a 3 cm folded hem with 2.5 mm needles an sewed the live stitches to the wrong side of the body.

The front
and the back

For the neckband I picked up & knit sts with a 2.5 mm circular needle: 82 sts at the front and 52 sts at the back. I worked it inside out because I knit faster than I purl. Knitted 7 rounds and bound off very loosely for some curl.

Then the sleeves: I picked up & knit 100 sts with needle 2.5 mm.
Knitted 50 rounds straight alternating 2 blues every round. Then I started decreasing every 10 rounds.

I wanted long sleeves and I was not sure I would have enough of the darker blue to knit both sleeves the same … so I changed colors at the end of the first sleeve.
Finally I knitted 200 rounds per sleeve and I will add a folded cuff as the body.

Well, in the end I hàd enough of the darker blue for the second sleeve, and as I like assymetry, I changed the striping in 2/2 rounds 😀

The front looks good but it can have a bit more excitement, haha 😀

I added duplicate stitch to two circles. Not sure if I will add more… Still needs blocking but I like it already.

. . . Vive la Fête . . .

A New Year 2024 full of Creativity, Happiness, Health and Peace are my wishes to everyone.

And a new pair of fingerless mitts with some festive swirls ;-D

3 different patterns: available separately or together in one e-book.

#1: A pair of fingerless mitts starting and ending with a cuff in corrugated ribbing and featuring an all over graphic pattern of interlocking quadruple spirals.

More info here

#2: with an all over pattern of triple spirals aka triskelions.

Info here

And #3 with double spirals in two sizes.

More info here

Which one do you prefer ?

. . . Spriiing! . . .

Although the weather is finally cooling down and fall is around the corner, I can’t wait to wear my ‘Spriiing!’. It is my favorite season, indeed. New growth, new buds, new life emerging …

Spriiing! is a lightweight pullover knitted top down.
It features two large flowers worked in intarsia. It is worked back and forth to not overly complicate the intarsia colorwork, so there is only one seam to close at the left side.


Stitches are picked to knit the sleeves top down in the round with short rows to shape the sleeve cap.

The sleeves are 3/4 but can easily be made shorter or longer.

The pattern is written but the intarsia colorwork is charted only.
For ease of reading and following the pattern it si split in two pdfs: one for the smaller sizes and one for the larger sizes.

Although the knitted pullover looks already great as is, dont’t you think so ?

I added some embellishments which was great fun to do.

Duplicate stitch, 3D-crochet and different embroidery stitches I certainly enjoyed it.

You can add as much or as little as desired.

They can be found in the separate pdf: Spriiing! embellishments, a photo tutorial with step by step instructions. These embellishments are optional, you can add as much or as little as desired.

Sizes
XS, S, M , L, XL, XXL, XXXL, XXXXL
finished measurements chest: 31½, 35½, 39½ , 43¼, 47¼, 51¼, 55, 59 “ (80, 90, 100, 110, 120, 130, 140, 150 cm)
Intended to be worn with 5 to 20 cm / 2 to 8” of positive ease

What you’ll need
light fingering weight / 3ply
MC: ± 900, 950, 1000, 1100, 1200, 1300, 1400, 1500 m
(990, 1040, 1100, 1200, 1300, 1420, 1530, 1650 yards)
CC1: between 200 en 250 m
( between 220 en 275 yards)
CC2: between 50 en 10 m
( between 55 en 110 yards)
CC3: small leftover
small amounts for the embellishments
(duplicate stitch, crochet and embroidery)

two 3 mm (US 2½) straight needles and
circular needles or size to obtain gauge
2.5 mm (US 1½) straight needles for the hem and circular needle for the neckband and cuffs
2 markers
tapestry needle

for the embellishments (optional)
2.5 mm crochet hook
a piece of tailor’s chalk or water soluble marker to draw on your knitting

Gauge
27.5 sts and 37.5 rows or rounds = 10 x 10 cm (4” x 4”)

Find out more about it here

. . . walnut dyeing . . .

We have a walnut tree. The birds planted it in our garden… Very visionary, forward-thinking, clever guys…

Every year in July it drops some unripe fruits: green walnuts with their husks. They smell so nice… Last year we made ‘vin aux noix’ from them. But this year I wanted to give dyeing a try.

This years’ walnut husks: about 350 grs

I put them inside a fabric bag and left them in water for two days. The water turned rather quickly in a dark brown color.

After removing the bag with the husks, just the liquid dye was left. I soaked the yarn (500 grs of undyed wool DK weight). The yarn doesn’t need to be mordanted. Yarn and dye go in a large pot and it is warming up to a light boil. It kept simmering just below cooking point for half an hour.

After half an hour simmering …

Left it to cool down completely and kept it in the dye for another day.

draining …
drying …

I didn’t rinse them because I am thinking to overdye them later with more walnut husks.

It became a very nice, warm, reddish pale brown.

I will try this again, definitely and maybe I will overdye them later to get a darker color.

. . . summer blues . . .

Omphalodes verna aka ‘creeping navelwort’, ‘petite bourrache printanière’, ‘Frühlings-Gedenkemein’ or ‘vroeg vergeet-me-nietje’: a little plant flowering early in spring.

But that is not why I write this blogpost 😀

There is a new pattern freshly published to ravelry. It’s called ‘Summer blues

It is lightweight, it is a vest, it is a pullover … if you add the sleeves …

It has an allover design of little flowers in stranded colorwork. It is not the easiest knit because it starts at the top knitting the colorwork back and forth meaning one needs to read the charts from right to left for the Right Side rows and from left to right for Wrong Side rows.

I could have written the pattern to work in the round with ‘steeks’, but in fact I don’t like steeks. Mostly because I don’t like the idea of not being able to rip the whole thing back and re-use the yarn for something else.

So, first the back is worked top down and back and forth.
Stitches are picked up & knit for both fronts which is also worked top down with a V-neck.
When reaching the same length as the back the body is worked further down in the round.

Lastly stitches are picked up for the sleeve bands in 1/1 ribbing.

If desired, stitches can be picked up & knit to add the (layered) 3/4 sleeves.

The pattern is written but the colorwork is charted only. Please read through the pattern before you print it. You won’t need all the pages, only the ones referring to your size.

The pattern has been tech edited by Sue-Cat

Go check out the testknits on ravelry: they are gorgeous. If you use a gradient for the flowers, it is just magic.

Sizes:
S, M/L, XL, XXL
finished measurements chest: 40, 46½, 53½, 60 “ (102, 119, 136, 152.5 cm)
Intended to be worn with 15 to 30 cm / 6 to 12” of positive ease

What you’ll need
light fingering weight / 3ply
sleeveless tee
MC: ± 650, 750, 900, 1000 m
(710, 820, 1000, 1100 yards)
CC: ± 420, 500, 600, 700 m
(460, 550, 660, 770 yards)
with 3/4 sleeves
add 120 to 170 m / 130 to 190 yards of MC
and 100 to 150 m / 110 to 165 yards of CC
3 mm (US 2½) circular needle and straight needles (optional) or size to obtain gauge
2.5 mm (US 1½) circular needle for the cuff in 1/1 ribbing at the sleeves
12 to 18 markers
2 removable markers
tapestry needle

Gauge
33 sts and 35 rounds or rows in stranded colorwork = 10 x 10 cm (4” x 4”)
29 sts in 1/1 ribbing = 10 cm (4”)
28 sts in stockinette stitch = 10 cm (4”)

Check it out here

. . . Diamonds & stripes . . .

I have a new pattern out …
It has taken its time even though it is a quite simple looking design. But then the simpliest things are sometimes the most time demanding.

Diamonds & stripes is a simple slightly oversized (or more fitted depending on your yarn choice) pullover with a basic raglan sleeve inset. It is worked top down and seamlessly in the round.

It features a lattice / diamond pattern on the body, twisted rib patterns on the sleeves and in the middle of front and back and a split hem that is longer at the back.

When I am past the separation sleeves/body, I often work the sleeves (and neckband) first to check if I will have enough yarn and how lang I will (or can) be making the body.

I used an alpaca DK weight, this is still unblocked

And here after a good soak (blocked)


A note on yarn choice: if you want a relaxed, oversized look (as the model), choose a yarn with some drape (wool/silk blends or alpaca, but if you prefer a more fitted look, choose a bouncy wool with some elasticity.

Sizes
XS-S, M-L, XL-XXL, XXXL
finished measurements chest: 39¾, 44, 52, 59¾ “ (101, 112, 132, 152 cm)
Intended to be worn with positive ease (10 to 25 cm / 4 to 10”).
Model is wearing M-L with 20 cm / 8” ease.

What you’ll need
DK weight
yardage: ± 1000/1200/1350/1500 m (1100/1320/1480/1650 yards)
4 mm (US 6) circular needle
3.5 mm (US 4) circular needle
3 mm (US 2½) circular needle
cable needle
9 markers
tapestry needle

Gauge
lattice pattern blocked: 21 sts and 28 rows = 10 x 10 cm (4” x 4”)
twisted rib pattern slightly stretched: 20.5 sts and 28 rows = 10 x 10 cm (4” x 4”)

Check it out here and see other examples with different yarns and colors

. . . leaves, leaves and flowers . . .

There are 8 new patterns published with botanical details: flowers and leaves.

First comes Spring memories

Find the mitt if you can

Spring memories is a set containing a hat and fingerless mitts with stranded colorwork in three colors featuring delicate white dandelions with yellow hearts. The yellow hearts are added afterwards using duplicate stitch. It is perfect to work up some little leftovers.
You could also try to work the yellow hearts in ‘intarsia’ as @Maddish on Ravelry did because they are only a few stitches wide. See post 40 in the test thread.

The Spring memory mitts are worked bottom up from cuff to fingers. They can be worn with the band up for warm fingers or folded down when you need your fingers to work.
They come in three sizes: small, medium and large. The sample is the medium size.

Sizes
Finished measurement hand circumference: S, M, L: 17.5 cm / 6¾”, 20 cm / 8”, 22.5 cm / 8¾”
to fit hand circumference: 18 to 19 cm, 20 to 22 cm, 22 to 25 cm (7 to 7½“, 7¾ to 8¾“, 8¾ to 10“)

And then there is also a hat: Spring memory hat

Find out more and see more examples in other colors here and here

I also made some mini-mitts for my 18 months little niece. One daisy on a little mitt.
They arrived at destination and … I was afraid they woudln’t fit, the mitts looked so very tiny but they DO fit 😀

Next is Climbing leaves,

a set containing a hat, fingerless mitts and a cowl (3 patterns) with stranded colorwork in two colors featuring delicate leaves.

The Climbing leaves hat is worked bottom up with a large folded brim.

It comes in three sizes: small, medium and large. The sample is the medium size.

Sizes
Finished measurement hat circumference at the brim (slightly stretched): 49 cm / 19¼”, 52 cm / 20½”, 56 cm / 22”
to fit head circumference: 52 to 56 cm / 20½ to 22“, 55 to 59 cm / 21½ to 23¼“, 57 to 63 cm / 22½ to 24¾“

The Climbing leaves mitts are extra long. Instructions are included to make a shorter version. They are worked bottom up from cuff to fingers. They can be worn with the band up for warm fingers or folded down when you need your fingers to work.
They come in three sizes: small, medium and large. The sample is the medium size.

Sizes
Finished measurement hand circumference: S, M, L (17.5 cm / 6¾”, 20 cm / 8”, 22.5 cm / 8¾”)
to fit hand circumference: 18 to 19 cm, 20 to 22 cm, 22 to 25 cm (7 to 7½ “, 7¾ to 8¾ “, 8¾ to 10 “)

And an extra warm cowl: the Climbing leaves cowl

It is double layered for extra warmth, worked bottom up starting with a provisional cast on that will be unraveled to graft both layers together. It comes in two sizes: small and large. The sample is the small size with a diameter of 61 cm / 24”. The large size is a long loop double the length (122 cm / 48”). It can be worn as is or you can double it around your neck for extra coziness and warmth.

Sizes
Finished measurement circumference: Small: 61 cm /24”, Large: 122 cm / 48”

More examples in other colors and more info here, here and here.

Finally the last 3 patterns: Oak leaves which I am particularly proud of.

Oak leaves is a set similar to the Climbing leaves set containing a hat, a cowl and fingerless mitts in stranded colorwork (three colors) featuring delicate oak leaves and acorns. The acorns are added afterwards using duplicate stitch.

The Oak leaves hat is worked bottom up with a large folded brim as the others. It also comes in three sizes: small, medium and large. The sample is the medium size.
Tips on colorwork and duplicating stitches included.

The Oak leaves mitts that can be worn with the band up for warm fingers or folded down when you need your fingers to work.

Also in three sizes: small, medium and large. The sample is the medium size.

And finally the cowl: Oak leaves cowl double layered for extra warmth.

The complete set

More info here, here and here.

. . . last minute gifts . . .

I finally made it 😀

This cute little pattern was in my to-do-list for yeeaars… Never found the time to make it…

Well, it’s not that one needs a lot of time. A couple of hours, some scrap yarn and two beads for the eyes is all it takes.

You could just embroider the eyes if you don’t have suitable beads around.

Here you can find the pattern for these cuties: flat rat pattern

I made a whole bunch of them 😀

For the eyes I used black beads (4 mm diameter)

One ‘rat’ measures about 10 cm / 4″ without the tail.

I gently soaked the bodies (not the heads) in water and pinned them out to dry flat.

Once dry I stapled books on them to flatten their bodies more.

The ‘flat rats’ in action…

Bookmarks … Funny. Isn’t it ?

So, if you are in need of some inspiration for last minute gifts …

Find the pattern here

. . . X-tee . . .

It all started with this very easy stitch pattern when I made a few little swatches to try out new patterns. I must admit that I rarely use stitch patterns from a book, I usually make them up myself…

Find out more and see more examples of X-tee here

With a yarn that has some sheen it gives the right but subtle contrast to show off the slipped stitch pattern. I used a cotton/bambou blend.

X-tee is a short sleeved tee or a pullover with drop shoulders and 3/4 sleeves. Both options are included.

I like to wear it over a shirt like this.

It features a subtle and very easy stitch pattern, a V-neck that follows the diagonal lines, and split hems. It is best to choose a yarn that has some sheen to enhance the effect of the diagonal lines.


First the back is worked top down and back and forth to the armpits. Then stitches are picked up to work the fronts to the armpits. From here the body is worked in the round in one piece. Stitches are picked up to work the 1/1 ribbing or to work longer sleeves using the same slipped stitch pattern.
Finally an applied I-cord can be added to finish the neckline – if desired.

Sizes
XS / S / M / L / XL / XXL / XXXL
finished measurements chest: 31¾ / 35¼ / 40¼ / 43¼ / 46½ / 50½ / 53½ “ (80.5 / 89.5 / 102 / 110 / 118 / 128.5 / 136 cm)

Intended to be worn with 7 to 13 cm / 3 to 5” of positive ease.

What you’ll need
fingering weight / 4ply
short sleeved tee
± 730, 820, 950, 1000, 1100, 1200, 1300 m (800, 900, 990, 1100, 1200, 1300, 1400 yards)
with elbow sleeves
add 200 to 350 m / 220 to 380 yards

3 mm (US 2½) circular needle and straight needles (optional) or size to obtain gauge
2.5 mm (US 1½) circular needle
3 mm (US 2½) double pointed needle for the I-cord finishing at the neck (optional)
6 markers
scrap yarn or stitch holders

Gauge
10 x 10 cm (4” x 4”) = 28 sts and 56 rows in slip stitch pattern with the 3 mm / US 2½ needle

Find out more and see more examples of X-tee here

. . . Florally – the pullover . . .

More info and examples here

When I was drawing the chart for this hat, I knew I would do more with it.

The original chart was much larger than what the part I used to make the hat…

I just didn’t know yet what I would make of the whole chart…

Until I dug up two beautful dark colored skeins of Dye For Yarn… and a blueish-greyish-natural skein from Snail Yarns.

They work so well together, the dark bordeaux looks almost velvet against the naturals.

Florally is a loose pullover with a V-neck, drop shoulders, 3/4 sleeves and a unique colorwork pattern at the bottom. Starting with a provisional cast on, the back is first worked bottom up and back and forth.

Stitches are bound off for the back neck, a subtle patterned saddle shoulder is worked followed by the fronts that are knitted top down to the armpits.

The saddle shoulder is quite subtle with a leaf motif in purl stitches and a third color – if desired.

Here is a little trick when joining both fronts of the V-neck worked top down. When you have knit both fronts to the right length and you join them, it often looks sloppy with a few elongated stitches at that join. To reinforce the join there is a simple trick: twist the last stitch of the right front and the first stitch of the left front you are joining to…


So, knit to the last stitch (or two stitches) of right front – in the photo above you can see that I twisted 4 stitches (2 at each front) -, place those stitch(es) on a cable needle and hold in front, then knit 1 or 2 stitches at the beginning of the left front, knit the stitches from the cable needle and continue the row (of course you don’t need a cable needle to twist those stitches, you can do it without, I only used it to explain the principle).

Another – even easier – method is to k2tog those 2 stitches, but you will end up having 1 stitch less.

From this point the body is worked further down in the round.
Stitches are picked up for the sleeves which are worked top down and in the round with a smaller motif at the cuffs.

Finally an applied I-cord finishes the neckline.

Sizes
XS / S / M / L / XL / XXL / XXXL
finished measurements chest: 31½, 34½, 39, 43, 47, 50½, 54“ (80, 88, 100, 109, 119, 129, 138 cm)
Intended to be worn with 7 to 13 cm / 3 to 5” of positive ease

What you’ll need
fingering weight / 4ply
sleeveless tee
MC1: ± 730, 820, 950, 1000, 1100, 1200, 1300 m (800, 900, 990, 1100, 1200, 1300, 1400 yards)
CC: ± 180, 200, 220, 250, 280, 300, 340 m (200, 220, 240, 280, 310, 330, 370 yards)
MC2 (optional) a small quantity ± 50 m (55 yards)
with elbow sleeves
add 200 to 350 m / 220 to 380 yards of MC1
and 60 m / 66 yards of CC

3 mm (US 2½) circular needle and straight needles (optional) or size to obtain gauge
3.25 mm (US 3) circular needle
2.75 mm (US 2) circular needle
3 mm (US 2½) double pointed needle
cable needle
4 markers
scrap yarn or stitch holders

Gauge
10 x 10 cm (4” x 4”) = 27.5 sts and 40 rows stockinette with the 3 mm / US 2½ needle
or 27.5 sts and 38 rows in stranded colorwork with the 3.25 mm / US 3 needle.

More info and examples here